HOME → Dragon Plastic Model Kits → 1/35 WWII Military → 6440


Barcode: 0 89195 86440 6
Case Pack: 20 pieces per master carton
Box Size: 9.6" x 15" x 2.8"
Features:
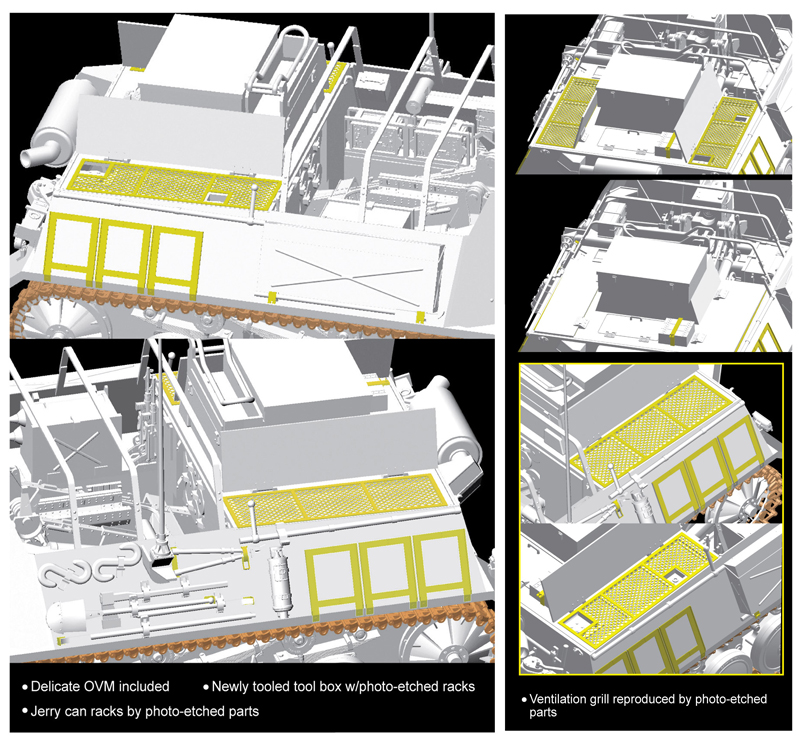
- Newly tooled tool box w/photo-etched racks
- Newly tooled ammo boxes w/photo-etched racks
- Brand new Bison II produced
- New arrangement of ammunition rounds, gasmask case, cartridge storage, MP40
rack and tool storage
- Delicate OVM included
- Jerry cans w/photo-etched racks included
- Photo-etched ventilation grill cover can be assembled open/closed
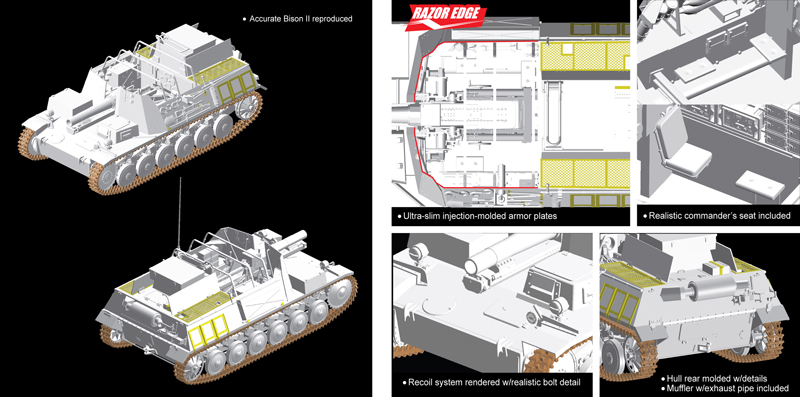
- Ultra-slim injection-molded armor plates
- Optional ammo box included
- Realistic commander’s seat included
- Recoil system rendered w/realistic bolt detail
- Hull rear molded w/details
- Muffler w/exhaust pipe included
- Driver’s hatch can be assembled open/closed0
- Extensively detailed s.IG 33 included
Reviews:
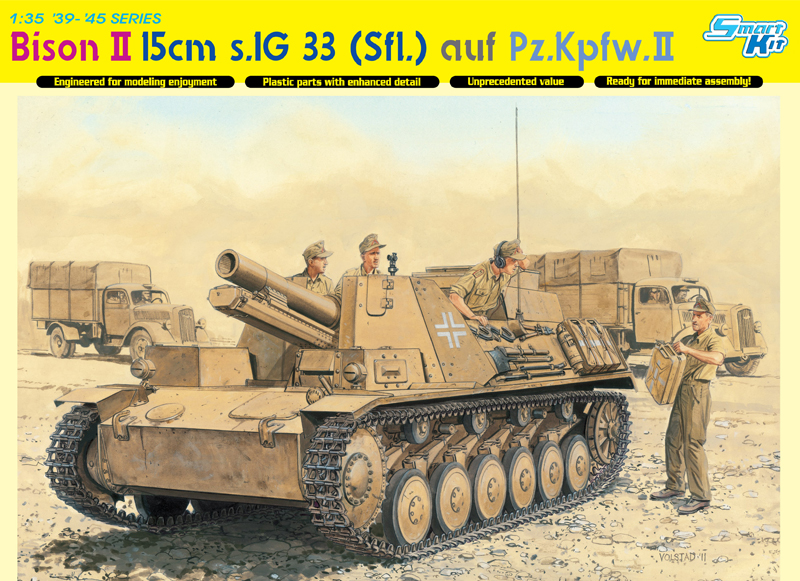
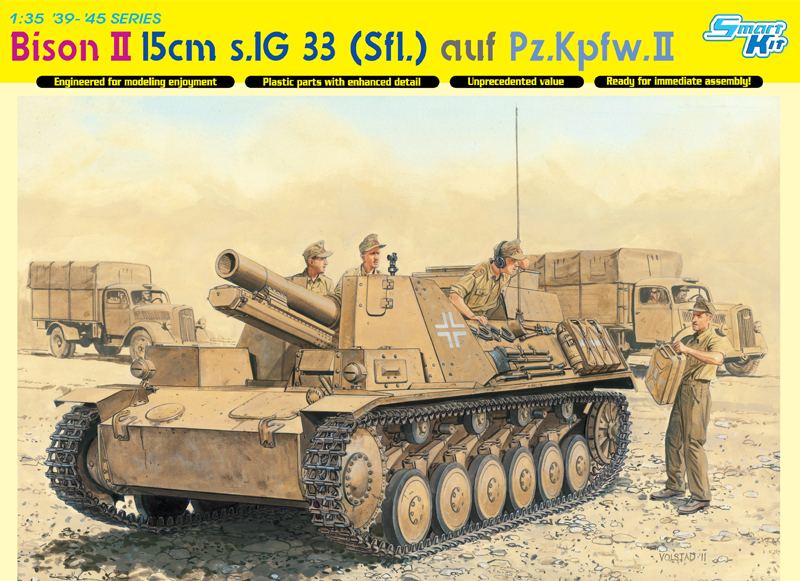
Bison II 15cm s.IG 33 (Sfl.) auf Pz.Kpfw.II
Manufacturer: Dragon models
Scale: 1/35
Material: Styrene, machined aluminium & PE
Serial Number: 6440
Price: TBA
Introduction
Manufactured in 1942-43, this vehicle mounted the 15cm s.IG 33 Infantry gun
to a specially lengthened Panzer II chassis with an extra roadwheel and resulting
in an open topped fighting compartment. The result didn't perform as expected
and only twelve were made, all of which appear to have served in North Africa.
Kit Contents
It's another stuffed full box from Dragon! There are pictures below of all the
sprues, even if there are more than one supplied. Along with all the grey styrene,
we're also supplied with two transparent sprues, two photo-etched frets, a machined
aluminium gun barrel and a decal sheet!
There are four new large sprues within the kit, the rest having all been seen
in earlier releases in one form or another, for example there are sprues from
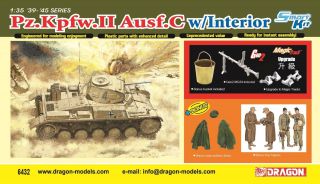
kit number 6261, the infantry gun itself, along with sprues from no.6432 the
Panzer II and also no.6429 the Grille M. The new sprues are mainly concerned
with the fighting compartment structure and fittings, plus added sixth roadwheel,
and of course a new lengthened hull.
Speaking of which...construction starts with the assembly of the running gear
onto the hull as you would expect. The moulding and detail are all state of
the art as you'd expect also. None of the component sprues can be said to have
come from old releases, all of them being relatively recently released. The
roadwheels all have manufacturers logo embossed on the tyres, and even the rubber
of the return rollers have manufacturer's logos. Each of the six suspension
units on either side is different, so care has to be taken to install the correct
one in each position or the tracks obviously won't sit right. The tracks themselves
are of the Magic Track individual link variety, each side being supplied in
a slightly different shade of grey, dark for the left and light for the right
hand side. Having said that, both of my sets are the same shade of grey, although
they are correct in being right and left handed. I'll just have to be careful
not get them mixed up!
Once the front and rear wall have been added to the lower hull, construction
then immediately moves onto assembling the deck, which begins with joining the
two fenders to the glacis. The fenders in this kit are supplied smooth, i.e.
without tread pattern of any sort, and happily, also without ejector pin marks
of any sort. I wish some other manufacturers would take note. Construction then
details installing the structural cross beams into the hull that will support
the gun. There's no detail as such provided for the inside of the driver's compartment,
but although in theory this area is open to the fighting compartment, in practice
the gun and it's mount totally obscure any visible access. The new armoured
superstructure for over the driver's position has internal detail on its hatch,
and there are transparent parts to construct the armoured glass block for the
vision port, but if you decide to pose the hatch opened, you'll have to put
something in place to obscure the view....such as a figure.
Construction on the fighting compartment itself then begins, with the taller
frontal armour and sidewalls, all being supplied as separate parts. These are
all moulded extremely thinly; therefore don't have the chamfered edges, as has
been done in some older kits. Careful planning should be the order of the day
when constructing this area of the kit, since it's a busy area and will be mostly
inaccessible once complete. It should be possible to leave each of the fighting
compartment walls off for separate painting, which looks likely to be the only
way to paint everything properly, since there's a wealth of detail to be included
on the inside of the walls...on the outside too of course, but it's much more
accessible there. On the inside there are ammunition racks, both with or without
rounds, stowage lockers, electrical boxes, personal kit items, and of course
full radio set up. It's at this point that Dragon indicate on the instructions
that all the various items of equipment such as tools etc., should be fitted
to the outside of the superstructure, although many modellers will of course,
choose to leave these off until much later in the build. They are extremely
busy and crowded once everything is in place. These were crowded vehicles, with
very little space to spare inside the vehicle, and therefore every inch both
inside and out was used to the maximum. You can at least be reasonably sure
that since it's a Dragon kit, if you do choose to leave everything as sub-assemblies,
everything will eventually fit as it should when the time comes! Always best
to keep dry fitting as you go though!
At the rear of the fighting compartment there appears to be a shell rack built
into the rear wall. This consists of eight stowed shells, two of which are modelled
empty...but solid if you see what I mean? I understand the idea is that the
two 'empty' spaces are painted black to represent empty spaces! To me this device
looks totally out of place in a modern Dragon kit. There's lots Dragon could
have done to improve this area, the very least of which would have been to mould
the two empty spaces open? Thankfully, it shouldn't be too difficult to improve
this area yourself, but it's a strange way of doing it and a tad unexpected.
Moving backwards, the large engine compartment at the rear of the vehicle is
provided with photo-etched grills for over the two large side air intake vents
on either side, each of which also had a large solid steel door that could be
used to close them off, so to display the photo-etched grills, these doors will
have to be posed raised. On the outside of the engine compartment on either
side there are racks, each of which holds three jerry cans. The racks themselves
are supplied as photo-etch, since as Dragon point out, injection moulded ones
would be noticeably over-scale in appearance. For each side there are three
jerry cans supplied, and on the PE fret there are three photo-etched seams supplied
for some other jerry cans somewhere, that aren't supplied in the kit. As much
as I admire Dragon kits and the superb level of detail they include, there really
is a major problem around PE parts for jerry cans that never...ever...fit the
jerry can they're intended for. These can be made to fit at least. Just shave
off the locating pins in one half of each of the cans, but this then means that
superglue must be used to assemble them, and lining everything up then becomes
a bit more awkward.
Construction then begins on the gun itself. As mentioned earlier, this is actually
the one supplied in kit no.6261 minus the carriage of course. It's superbly
detailed, and a lot of thought has obviously gone into the engineering of the
parts so as to ensure the elimination of visible joins etc. Each side of the
mount is first constructed and detailed, before joining the two with the central
baseplate. Even the main gun slide is fully detailed on its inside surfaces,
with a separate insert for the bottom of the slide to fully cover any join.
It's worthwhile spending some time on the breech assembly, since this is provided
in two halves, and especially if you're going to leave it steel coloured then
any join will be very noticeable if not perfectly done. The barrel is superb.
Machined aluminium, with extremely fine rifling inside, just slips into the
breech assembly. A photo-etched firing table is also supplied for fixing to
the inside of the shield.
With regards to markings, there are seven schemes illustrated below on the
instructions, all but two of which are from North Africa, those two being depicted
in all over panzer grey. See below for full details.
Conclusion
A beautifully rendered kit of an unusual looking vehicle that will have Axis
modellers queuing up. Having previously built the gun itself when separately
released, this one is bound to be a pleasure to build and will look superb once
complete! Recommended.
- Vinnie Branigan
Kit, DML 6440, Bison II 15cm s.IG33 (Sfl.) auf Pz.Kpfw.II
1/35th-scale styrene/multimedia kit containing 400 styrene parts (including 25 clear), two bags of Magic Track, two photo-etched brass frets, one turned aluminum gun tube, seven water-slide decal marking schemes and eight pages of instructions in 21 steps.
Introduction.
Based upon experience reports from units that deployed with the 15cm s.IG33 mounted on the Pz.Kpfw.I Ausf.B, a roomier chassis was requested upon which to mount the heavy infantry gun. Eventually, a widened and lengthened chassis using the engine and drive train, as well the suspension system from the Pz.Kpfw.II was developed. A total of 12 15cm s.IG33 (Sfl.) auf Pz.Kpfw.IIs were eventually built and all were shipped to North Africa for use by Rommels legendary Deutsches Afrika Korps. While the gun itself was well-appreciated for its power, the chassis was grossly underpowered. In addition, poor engine ventilation caused numerous break-downs, resulting in extremely poor serviceability. That the DAK was at the far end of a tenuous supply chain and Hitler considered Africa a side-show, spare parts were at a premium. Thus, when Rommel was sent reeling west after El Alamein in 1942, several 15cm s.IG33 (Sfl.) auf Pz.Kpfw.IIs were found in a disassembled state in German repair parks.
That the 15cm s.IG33 (Sfl.) auf Pz.Kpfw.II was considered to be a tactical failure by its users has not lessoned its appeal to modelers. Back in the 1990s, Alan, from Russia kitted this vehicle in 1/35th scale. It had all the attributes of an Eastern European kit of the era, to include overly thick moldings and less than optimum detail; but it was all there was. In a not unanticipated move, earlier this year DML announced the impending release of this kit. It is now available and as expected, it combines parts from two previous offerings with new ones to create one of Rommels Funnies.
Since most parts are from DMLs previous Pz.Kpfw.II and s.IG33 kits, portions of this report will be lifted directly from those previous posts here on MLs ToT page, with revisions where appropriate.
Tracks.
From the ground, up, these are individual-link Magic Tracks, which press-fit together. They come in two separate bags since they are handed, meaning that each bag is for use on a specific side of the vehicle; they are also molded in two different shades of grey to differentiate them. So, dont open the bags, pour the links out and begin to assemble them; youll get yourself into trouble. The fit of the links is relatively positive, but they will not take rough handling and will most certainly need to be fixed with cement after the fit is finalized. They all have a tiny pip at one edge from the mold, which is all-but-invisible and there are no knock-out pin marks at all.
Suspension System.
The new road-wheels are very nicely-rendered and include weld details around their rims and manufacturers logo on the rubber tires; the return rollers are similarly detailed. The configuration of the rims does not match photos. The same holds true for the original road-wheels, still included in the box. There are four variations in idler wheels, all of which include a separate rim ring for the proper appearance; only one type is marked for use, so be careful. The idler wheel axle is separate and can be positioned to adjust the final fit; do not glue it in place until you are satisfied with the tracks final appearance.
There are two variations in drive sprockets each with differing rim bolt pattern details; again, only one is for use. The final drive housings are laid-out somewhat like those in DMLs Pz.Kpfw.IV kits in that there are some tiny bolt heads that must be cut from a sprue and added separately by the modeler. The onepiece, narrower spring bundles are all separate parts, each of which has a tiny bracket added to them; the bump-stops are also separate.
Hull.
The lower hull pan is a one-piece affair that incorporates the side plates; the belly is detailed with access panels and bolts. It is finished with separate bow and stern plate assemblies. The trailer hitch is also a multi-part affair and there is a separate access hatch lid as well as a separate smaller port and a lateral reinforcing bar. The area is finished off with a pair of tow rings.
The bow plate is a separate part and there are separate parts representing the inner plates of the final drive housings mounted on either side. The glacis plate is separate and it features a separate access hatch lid and a separate circular access plate; the latter has internal frame detail on the corresponding glacis plate opening.
A multi-part assembly is used to create the drivers compartment armor plate. It features a separate hatch lid, separate view-port flaps with internal detail, and the drivers main visor. Attached to this assembly is a stowage box with separate lid.
Track-guards and Fittings.
The separate track-guards do not have any non-skid patterns, so typical of German AFVs. There are separate mounting brackets, one for each side. A pair of Tarnscheinwerfer-Bosch black-out head-lamps are mounted to the track-guards, one on each side; the port side also mounts a multi-part horn. There are separate mud-flaps on the rear ends; one mounts a distance-keeping tail lamp, the other a brake lamp.
Superstructure and OVM.
Working from front-to-back, the front of this open-topped AFV features splinter shields that are attached to the gun mount, and traverse with it in its limited arc. On either side, there is another plate fills the area behind the shields; these bend and continue on the sides to enclose the fighting compartment. Since internal (and external!) space was certainly at a premium, much of the OVM stowage was seen on the side plates. The port side held a pair of S-hooks, a wire cutter, long and short pry-bar, shovel and an axe. The wire cutter received etched brass clasps, while the other tools have their clasps molded in place. A rod antenna, rubber base, splinter shield and rotating mechanism is also mounted here, in front of the wire cutters. Further aft, on the engine compartment side walls, a fire extinguisher and three jerry cans were mounted. Etched brass parts are used to create the stowage racks and retainer strap, as well as the weld bead that joined the cans together. This configuration is continued on the opposite side, while further forward, a multi-part bore swab and staff stowage locker is fitted. Below that is a long pry-bar and some etched brass detail parts.
The engine deck area is based on a single part for the side and rear walls. Its roof plate has openings to fit air intake and exhaust grills, covered in separate etched brass mesh. Separate lids are given and they can be positioned opened or closed; considering the vehicles reputation for engine overheating, the open position should be preferred. Theres another separate access hatch lid (with separate handle) and the jack block, with etched brass mounting bracket is also seen here. A series of stowage lockers are stacked one above the other; separate lids are provided. There is also a multi-part assembly whose function is lost on me; that gets mounted on one of the lockers.
The back wall of the engine deck is where the exhaust muffler is fitted. Unique (for the Pz.Kpfw.II series, at any rate) the multi-part exhaust muffler includes a pre-bored pipe and weld bead detail. Below that is s separate part that represents the flange that was used to bolt the engine deck to the hull. A multi-part jack and a pair of tow hooks complete this area.
Fighting Compartment Interior.
A relatively cluttered fighting compartment interior is provided. Due to a lack of surviving data, some areas may be conjectural, but in most cases, standard items are the order of the day. A pair of MP40s are stored on the compartments back wall, on the starboard side; below them is a seat pad. Each corner also receives a lift-hook. The center of this area is detailed as if to represent eight stowed projectiles, with two already removed. The depth of the latter area is very shallow. Some black paint or drilling the holes out will improve the appearance.
The inside of the starboard side has a separate pair of braces, two ammo racks, two shells and a pair of gas masks with etched brass brackets. A fire extinguisher, small etched brass bin and a stowage locker are added here. Below is a drive shaft tunnel, a seat pad and a pair of MP40 magazine racks. On the opposite side, the floor has a styrene and etched brass seat and some radio equipment; another seat pad is fitted on the side wall of the hull. A group of six propellant cells are mounted on the sponson as are the remaining radio set components.
The means of mounting the gun to the chassis is represented in typical fashion using four parts for the actual girders that held the guns carriage. A fifth girder is mounted further back, to accept the rear of the trails, there is also another bulkhead with a separate detail part fitted even further aft. The inside of the guns traversing splinter shields are tricked-out with etched brass firing tables and there is a separate flap to cover the gun-sight aperture.
15cm s.IG33.
The gun is completely-detailed throughout and is based on parts previously seen on various DML releases, notably the Bison I. The piece will elevate and recoil if the modeler is careful with the glue during assembly.
The gun tube is provided as a turned aluminum part with rifling in the bore. The breech block can be modeled opened or closed, while the gunners sight is provided as a pair of clear parts; it has the option of being depicted fully-extended or retracted. All hand-wheels are separate as are the equilibrators. The recoil slide is completely detailed, inside and out
The carriage itself well-replicates the massive, workman-like (yet archaic-looking) appearance of the original, including the box-type trails. It is broken down into many parts for maximum detail fidelity and has molded-on details such as rivets and stiffening members. Many smaller detail parts decorate the remainder of the assembly. These include linkages, brackets, panels, covers, hand-grips and other items, notably the remnant of the original towed guns wheel axles.
Molding, Fit and Engineering.
Overall, I found the fit of the main components to be very good. There were no sink marks of any consequence, and in all cases ejector pin marks were eliminated from any visible surface. The superstructure side walls and the guns splinter shields were especially noteworthy for their thinness.
Instructions.
As always with DML, the instructions are extremely busy but very well-rendered as traditional line art. Many sub-steps are called out in each of the 21 main steps; the modeler should proceed with caution and not glue anything down until he is sure of its place.
Accuracy.
According to the limited vehicle-specific references to which I have access, the kit appears to be accurate as far as can be seen. As mentioned above, the road-wheels in the box do not match photos; this applies to the new as well as to the old set, both of which are in the box.
Decals and Markings Information.
Water-slide decals from Italys Cartograf are provided to mark seven vehicles. The designs are very crisply printed on thin matte carrier film with fine color saturation. Only 12 of these vehicles were built, with all being sent to North Africa and assigned to schwerer Infanterie-Geschutze-Kompanien (sfl) 707 and 708. Markings for seven Bison IIs are provided. Two are in Dunkelgrau, with the remainder painted in the Tropen (tropical) scheme. As is usual, colors are keyed to hobby paints manufactured by Testors and Gunze. This means that the colors are not necessarily correct. For instance, one scheme calls for the use of Feldgrau (which is distinctly green), while another is a Luftwaffe color, RLM 74 Dark Grey. The lesson here is to check references before applying paint. Regardless, photos confirm most of the markings given as being accurate.
Conclusion.
The Bison II represents another missing link in the development of the Pz.Kpfw.II and it is nice to see a state-of-the-art rendition being made available. About the only thing that should give the modeler pause is the issue of the road-wheels; otherwise, this looks to be s fun and interesting build.
- Frank V. De Sisto
Kit Review: Dragon Models Limited 1/35 scale '39-'45 Series Kit No. 6440; Bison
II - 15 cm s.IG 33 (Sfl.) auf Pz.Kpfw. II - Smart Kit (2011); 885 parts (571
in grey styrene, 224 “Magic Track” single links, 64 etched brass, 25 clear styrene,
1 turned aluminum); pre-order price US$49.95 via Dragon USA Online
Advantages: nice, new injection kit of one of the more popular Pzkw. II conversions;
plentiful new parts to meld two older kits into a new one
Disadvantages: single link tracks tedious to assemble
Rating: Highly Recommended
Recommendation: for all German WWI and Africa fans
The Germans were very quick to adapt obsolete tank chassis to new purposes as
the carriages for self-propelled guns, but the early ones built on the Pzkw.
I chassis were usually too fragile to carry much in the way of weaponry – or
protection. It was only when the Pzkw. II was felt to be obsolete and taken
out of tank production that a good light chassis became available for use as
an antitank gun (Marder II series) or a self-propelled 10.5 cm (Wespe) or 15
cm artillery (Bison II) mount.
While the Pzkw. I variant of this latter weapon was considered nominally successful,
it was top-heavy and really too much for the slightly modified chassis. For
the second model the Pzkw. II chassis was lengthened by one road wheel station
and a purpose-built mount added for the s.IG 33 howitzer; while the howitzer
kept its basic carriage the entire lower section was removed which basically
meant it was no longer “convertible” back to its towed version.
Like late 1950s US automobiles the new weapon was longer, lower and wider, and
much more durable, entering production in December 1941. But only 12 of these
weapons were produced before it was decided that the Pzkw. 38(t) chassis was
even better suited and did not need as many modifications. Those guns produced
were allocated to two heavy infantry gun companies with the Afrika Korps and
served until the last gun was knocked out in December 1942.
Of all of the Panzer II conversions this one, appearing sleek and purposeful,
has always been much more popular with modelers than its tiny production run
would otherwise dicate. Most of those attending the 2009 IPMS/USA Nationals
in Columbus saw the magnificent 1/72 scale 15 cm by Harvey Low that even disassembled
to show the interior. Now DML has taken the parts from their Panzer II F and
B/C kits and their s.IG 33 kit and, adding nearly another 200 new mold parts,
has created the 15 cm s.IG 33 auf Pz.Kpfw II to their stable.
The kit is nicely done and many of the parts from the earlier kits, even though
included on the sprues, are replaced by new mold parts. Modelers who have picked
up the Panzer I and Panzer 38(t) conversions will notice some parts look familiar
(such as the projectiles and fuse boxes) but have been “tweaked” for this kit.
As usual the DML instructions are fussy and combine a lot of bits in each step.
The suspension uses a wide variety of parts from the old and new trees so be
careful in selecting the items needed for assembly. Also note in Step 5 the
twin casemate sections (one for the driver) for the forward hull are linked
together; that is not a section of sprue between the two parts.
Most of the rest of the kit is pretty straightforward to assemble. Keep in mind
that a large number of parts such as tools, MP40s, radios, fire extinguishers
et al mount inside the sides of the casemate and should be attached before mounting
the sides. The directions are not real clear but you have two options for the
rear air intakes – either close them with two doors (parts P29) or cover them
with brass grilles (MA1 and MA2) and leave the doors in the open position. There
is no engine, but as there are "solid" radiator cores under the grilles
(C17 and C18) ensure you paint them first.
Since the trail of the s.IG 33 stick into the engine bay with gaps on either
side and above it, this will be a tough model to get a good finish to the rear
of the hull so be forewarned.
Technical consultants are Tom Cockle and Gary Edmundson.
Seven finishing options are provided, mostly covering the two units: s.IG.Kp.
(mot.S) 707, Afrika Korps, Libya 1942 (two different paint schemes, green over
sand brown); s.IG.Kp. 708, Afrika Korps, Libya 1942 (three different paint schemes,
green over sand brown); and two schemes of gray vehicles in Germany with either
shipping stencils or generic white crosses. A targeted sheet of Cartograf decals
is provided.
Overall this should be a very popular Panzer II conversion model.
- Cookie Sewell
6440: Bison II 15cm s.IG 33 auf Pz.Kpfw. II
1/35 injection plastic kit with multimedia accessories and decals
The Bison II was one of the earlier self propelled guns fielded by the German army in WWII. It mounted the proven heavy infantry gun the s.IG 33 on a modified Panzer II chassis. Initial tests revealed that the standard Panzer II chassis was too small, and as a result it was lengthened by adding a sixth road wheel and also widened. A V8 Buessing-NAG engine was fitted east-west across the rear. Alkett assembled twelve of these self propelled guns in late 1941/early 42. All of these were sent to North Africa, where the crew reported problems due to the chassis being overloaded. The last guns were lost in the months following the El Alamein offensive.
OVERVIEW
This new Dragon kit is the first 1/35 model from a mainstream manufacturer of the 15cm s.IG 33 auf Pz.Kpfw. II, which is popularly known as the Bison II. It is in the Smart Kit format and due to its distinctive design, has many new key parts including a new hull and superstructure. This is a comprehensive kit with a busy open fighting compartment. It features Magic Tracks, clear plastic for the optics, and a metal barrel. The gatefold instructions have 21 steps of line drawings.
The new photo etch is on a medium size fret and most of the fret is devoted to the external jerry can racks and mesh screens over the engine vents. Other parts include the range tables (separate fret), clamps and brackets for some of the externally mounted tools, and the straps for the gas mask canisters.
NEW SUPERSTRUCTURE
This kit has a new upper hull and superstructure. In order to save weight, the Bison II had thin low armour plates around the open crew compartment. Additional plates surrounded the new rear engine bay and adjoining rear ammunition bin. These armor plates are depicted nicely with a thin profile on the upper edges and attention to detail such as weld marks and corner bracing plates.
Dragon’s careful use of large pieces, which encompass several metal plates, ensures that the finished kit will be crisply aligned. When combined with the positive alignment of parts, this greatly reduces the risk of unwanted gaps between panels. I found the design and fit of the parts for the superstructure to be very professional. The metal flaps over the engine vents can be modeled up to reveal the PE mesh screens. The new multi-part exhaust is fitted to the upper rear hull and has a hollow end to the exhaust pipe and attention to the stepped ends on the muffler.
A larger number of tools are stored on the AFV’s sides and some have optional PE clasps, while others only have integrated clasps. All tools are to the current Smart Kit standard. The external jerry can racks are built using PE for the frames to give an in-scale appearance. The six 20 litre jerry cans each have PE centre for the weld marks and separate parts for the handle and spout/cap. Optional four-part PE can be used to replace the latches on the storage box above the engine bay.
The fighting compartment has all the expected fittings include a driver’s seat, gas masks with PE brackets, fire extinguisher, racks for ammunition (rounds included), multipart radios (transmitter & receiver) with conduit and antenna, two MP40s on racks, and cartridge stowage boxes (with crisp handles etc). The side ammunition bin can be built empty or full, while the rear is tooled full.
HULL & SUSPENSION
Thee hull is based on a new one-piece tub, which has integrated return roller mounts and plenty of detail on the belly plate. The side fenders are separate parts with a lip (fold) on the outer edge, and separate fender support brackets and rear fender flaps. Other separate parts include the upper front hull, several access/inspection flaps, driver’s compartment, and the driver’s hatch and vision flaps.
The suspension is detailed, both for those parts most visible on the finished kit and also for the leaf spring suspension. The road wheels are retooled and have a separate part for the inner side of the wheel. The outer wheel part includes the tire and hub with counter sunk bolts. The tires and return rollers are labeled “Continentau”.
The pre-cut Magic Tracks are Panzer II links with solid guide horns and are "handed" in that separate left and right side tracks are in their own plastic bag. The links can be quickly joined together to form a whole track run.
s.IG 33 HOWITZER
The s.IG 33 is based on the recently released towed version of this howitzer, and retains the carriage, but forfeits the wheels and original gun shield. It is also in the Smart Kit format and includes a barrel made from turned aluminum with internal rifling at the muzzle end. This kit has a new low profile gun shield with tapered Razor Edges to give a more in scale effect and no sink marks. The slide moulding provides crisp detail on both sides of the shield for hinges, bolt heads etc. Separate PE range tables with plenty of raised detail are fixed to the shield. A separate flap over the gun sight can be modeled open or shut. The injection plastic mounting rods for the shield are crisply tooled.
The howitzer has sharp detail for features such as the elevation mechanism, recoil system, numerous bolt heads, hand-wheels and the clear plastic periscopes. The gun can be modeled in the full range of elevations and positioned either recoiled or not. The carriage frame has considerable cast on small detail such as bolt heads, round plates and bracing.
New parts depict the steel cross beams that supported the gun as well as the upright beams which supported the cross beams. These parts realistically capture the H profile of metal beams.
PAINT SCHEMES & DECALS
The instruction sheet and colour profiles on the box presents seven paint schemes. Five are from North Africa where the Bison II served with s.IG.Kp. 707 and 708 (Mot. S) (Heavy Gun Company Motorized), Afrika Korps in Libya in 1942. These front line guns all have a dark yellow base and some have dark grey bands; I found the extent of dark grey showing through was hard to judge from photos, but was distinct in some photos as suggested by the painting guide. These guns have varying types of Balkan Crosses, DAK emblems and in some cases gun numbers.
The other two schemes are from when the guns were in Germany before shipping to North Africa. Both schemes are solid dark grey with Balkan Crosses. The decals are from Cartograf.
RECOMMENDATION
The Bison II 15cm s.IG 33 (Sfl.) auf Pz.Kpfw.II is a welcome addition to the Smart Kit range, as it offers a first rate model of an AFV which saw service in the popular North African campaign. For me it ticks the three important boxes of being crisply tooled, able to be built out of the box and the first 1/35 scale release of this kit from a leading manufacturer. Highly recommended.
- s.IG 33 gun carriage accurately represents the real one
- Access plate for gun sight can be assembled in an open or closed position
- Accurate details on hull bottom
- Updated road wheels w/enhanced detail
- Delicate Magic Tracks included
While the Panzer II was outclassed as a tank following the outbreak of WWII, the chassis spawned a succession of other armored fighting vehicles for the Wehrmacht. One of those was the Bison II 15cm s.IG 33 (Sfl.) auf Pz.Kpfw.II. This was a self-propelled howitzer mounting the well-known 15cm s.IG 33 infantry gun that had a range of 4,700km. The first Bison II prototype was produced in July/August of 1941, and the design featured a lengthened hull (with an extra road wheel each side) to accommodate the howitzer. It employed a Bussing-NAG engine, which proved problematic in moving the 16-ton vehicle around the battlefield. A crew of four operated the Bison II, but they were given little armor protection. The limited numbers produced were shipped to Libya in early 1942 for combat use in North Africa. The Bison II was eventually replaced by the better-designed Wespe.
Dragon has produced a high-quality 1/35 scale model of this interesting and rare self-propelled howitzer. There are many newly tooled parts exclusively created for this kit – for example, the chassis, upper hull and fighting compartment are brand new. As a Smart Kit, there is widespread use of slide molds in its production. The open-topped fighting compartment is particularly well detailed, with Dragon’s proprietary Razor Edge technology used to produce true-to-scale armor plates. The road wheels have also been updated. Its firepower is improved after Dragon’s highly praised s.IG 33 gun receives a new shield. With the addition of Magic Tracks, this kit of a vehicle that operated in North Africa’s desert terrain is certain to be a hot item!

